接線方式:(參考:https://blog.jmaker.com.tw/arduino-ssd1306-oled/)
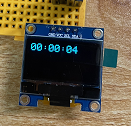
第一個程式,寫一個計時功能。(因為Arduino UNO沒有時鐘,所以改計時)
================================
#include <Wire.h>
#include <Adafruit_GFX.h>
#include <Adafruit_SSD1306.h>
#define SCREEN_WIDTH 128 // OLED display width, in pixels
#define SCREEN_HEIGHT 64 // OLED display height, in pixels
// Declaration for an SSD1306 display connected to I2C (SDA, SCL pins)
Adafruit_SSD1306 display(SCREEN_WIDTH, SCREEN_HEIGHT, &Wire, -1);
void setup() {
// initialize and clear display
display.begin(SSD1306_SWITCHCAPVCC, 0x3C); // Address 0x3C for 128x64
display.clearDisplay();
display.display();
}
void loop() {
display.clearDisplay();
display.setTextSize(2);
display.setTextColor(WHITE);
unsigned long currentTime = millis();
unsigned long seconds = currentTime / 1000;
unsigned long minutes = seconds / 60;
unsigned long hours = minutes / 60;
seconds = seconds % 60;
minutes = minutes % 60;
display.setCursor(0,0);
if (hours < 10)
display.print('0');
display.print(hours, DEC);
display.print(':');
if (minutes < 10)
display.print('0');
display.print(minutes, DEC);
display.print(':');
if (seconds < 10)
display.print('0');
display.print(seconds, DEC);
display.display();
delay(1000);
}
==========================
實測可行。
第二個程式:把原本數字計時,改成指計。
===========================
#include <Wire.h>
#include <Adafruit_GFX.h>
#include <Adafruit_SSD1306.h>
#define SCREEN_WIDTH 128 // OLED display width, in pixels
#define SCREEN_HEIGHT 64 // OLED display height, in pixels
// Declaration for an SSD1306 display connected to I2C (SDA, SCL pins)
Adafruit_SSD1306 display(SCREEN_WIDTH, SCREEN_HEIGHT, &Wire, -1);
#define CLOCK_CENTER_X 64
#define CLOCK_CENTER_Y 32
#define CLOCK_RADIUS 30
void setup() {
// initialize and clear display
display.begin(SSD1306_SWITCHCAPVCC, 0x3C); // Address 0x3C for 128x64
display.clearDisplay();
display.display();
}
void loop() {
display.clearDisplay();
unsigned long currentTime = millis();
unsigned long seconds = currentTime / 1000;
unsigned long minutes = seconds / 60;
unsigned long hours = minutes / 60;
seconds = seconds % 60;
minutes = minutes % 60;
hours = hours % 12;
// draw clock face
display.drawCircle(CLOCK_CENTER_X, CLOCK_CENTER_Y, CLOCK_RADIUS, WHITE);
// draw hour hand
drawHand(hours / 12.0, CLOCK_RADIUS * 0.5, 4);
// draw minute hand
drawHand(minutes / 60.0, CLOCK_RADIUS * 0.7, 2);
// draw second hand
drawHand(seconds / 60.0, CLOCK_RADIUS * 0.9, 1);
display.display();
delay(1000);
}
void drawHand(float fraction, float handLength, uint8_t handWidth) {
float angle = fraction * 2.0 * PI - PI / 2;
int16_t x = (int16_t)(CLOCK_CENTER_X + cos(angle) * handLength);
int16_t y = (int16_t)(CLOCK_CENTER_Y + sin(angle) * handLength);
display.drawLine(CLOCK_CENTER_X, CLOCK_CENTER_Y, x, y, WHITE);
display.drawLine(CLOCK_CENTER_X + 1, CLOCK_CENTER_Y, x + 1, y, WHITE);
display.drawLine(CLOCK_CENTER_X, CLOCK_CENTER_Y + 1, x, y + 1, WHITE);
display.drawLine(CLOCK_CENTER_X + 1, CLOCK_CENTER_Y + 1, x + 1, y + 1, WHITE);
}
========================
測試成功:
第三個程式:左邊指令,右邊數字時鐘
=第一次===
#include <Wire.h>
#include <Adafruit_GFX.h>
#include <Adafruit_SSD1306.h>
#define SCREEN_WIDTH 128 // OLED display width, in pixels
#define SCREEN_HEIGHT 64 // OLED display height, in pixels
// Declaration for an SSD1306 display connected to I2C (SDA, SCL pins)
Adafruit_SSD1306 display(SCREEN_WIDTH, SCREEN_HEIGHT, &Wire, -1);
#define CLOCK_CENTER_X 32
#define CLOCK_CENTER_Y 32
#define CLOCK_RADIUS 30
void setup() {
// initialize and clear display
display.begin(SSD1306_SWITCHCAPVCC, 0x3C); // Address 0x3C for 128x64
display.clearDisplay();
display.display();
}
void loop() {
display.clearDisplay();
unsigned long currentTime = millis();
unsigned long seconds = currentTime / 1000;
unsigned long minutes = seconds / 60;
unsigned long hours = minutes / 60;
seconds = seconds % 60;
minutes = minutes % 60;
hours = hours % 24;
// draw clock face
display.drawCircle(CLOCK_CENTER_X, CLOCK_CENTER_Y, CLOCK_RADIUS, WHITE);
// draw hour hand
drawHand(hours / 12.0, CLOCK_RADIUS * 0.5, 4);
// draw minute hand
drawHand(minutes / 60.0, CLOCK_RADIUS * 0.7, 2);
// draw second hand
drawHand(seconds / 60.0, CLOCK_RADIUS * 0.9, 1);
// draw digital clock
display.setTextSize(2);
display.setTextColor(WHITE);
display.setCursor(70,0);
if (hours < 10)
display.print('0');
display.print(hours, DEC);
display.print(':');
if (minutes < 10)
display.print('0');
display.print(minutes, DEC);
display.print(':');
if (seconds < 10)
display.print('0');
display.print(seconds, DEC);
display.display();
delay(1000);
}
void drawHand(float fraction, float handLength, uint8_t handWidth) {
float angle = fraction * 2.0 * PI - PI / 2;
int16_t x = (int16_t)(CLOCK_CENTER_X + cos(angle) * handLength);
int16_t y = (int16_t)(CLOCK_CENTER_Y + sin(angle) * handLength);
display.drawLine(CLOCK_CENTER_X, CLOCK_CENTER_Y, x, y, WHITE);
display.drawLine(CLOCK_CENTER_X + 1, CLOCK_CENTER_Y, x + 1, y, WHITE);
display.drawLine(CLOCK_CENTER_X, CLOCK_CENTER_Y + 1, x, y + 1, WHITE);
display.drawLine(CLOCK_CENTER_X + 1, CLOCK_CENTER_Y + 1, x + 1, y + 1, WHITE);
}
數字超過寬度,跑到下一行。
請chatgpt修改:寬度
=====第二次============
#include <Wire.h>
#include <Adafruit_GFX.h>
#include <Adafruit_SSD1306.h>
#define SCREEN_WIDTH 128 // OLED display width, in pixels
#define SCREEN_HEIGHT 64 // OLED display height, in pixels
// Declaration for an SSD1306 display connected to I2C (SDA, SCL pins)
Adafruit_SSD1306 display(SCREEN_WIDTH, SCREEN_HEIGHT, &Wire, -1);
#define CLOCK_CENTER_X 32
#define CLOCK_CENTER_Y 32
#define CLOCK_RADIUS 30
void setup() {
// initialize and clear display
display.begin(SSD1306_SWITCHCAPVCC, 0x3C); // Address 0x3C for 128x64
display.clearDisplay();
display.display();
}
void loop() {
display.clearDisplay();
unsigned long currentTime = millis();
unsigned long seconds = currentTime / 1000;
unsigned long minutes = seconds / 60;
unsigned long hours = minutes / 60;
seconds = seconds % 60;
minutes = minutes % 60;
hours = hours % 24;
// draw clock face
display.drawCircle(CLOCK_CENTER_X, CLOCK_CENTER_Y, CLOCK_RADIUS, WHITE);
// draw hour hand
drawHand(hours / 12.0, CLOCK_RADIUS * 0.5, 4);
// draw minute hand
drawHand(minutes / 60.0, CLOCK_RADIUS * 0.7, 2);
// draw second hand
drawHand(seconds / 60.0, CLOCK_RADIUS * 0.9, 1);
// draw digital clock
display.setTextSize(1); // reduce text size
display.setTextColor(WHITE);
display.setCursor(72,0); // adjust cursor position
if (hours < 10)
display.print('0');
display.print(hours, DEC);
display.print(':');
if (minutes < 10)
display.print('0');
display.print(minutes, DEC);
display.print(':');
if (seconds < 10)
display.print('0');
display.print(seconds, DEC);
display.display();
delay(1000);
}
void drawHand(float fraction, float handLength, uint8_t handWidth) {
float angle = fraction * 2.0 * PI - PI / 2;
int16_t x = (int16_t)(CLOCK_CENTER_X + cos(angle) * handLength);
int16_t y = (int16_t)(CLOCK_CENTER_Y + sin(angle) * handLength);
display.drawLine(CLOCK_CENTER_X, CLOCK_CENTER_Y, x, y, WHITE);
display.drawLine(CLOCK_CENTER_X + 1, CLOCK_CENTER_Y, x + 1, y, WHITE);
display.drawLine(CLOCK_CENTER_X, CLOCK_CENTER_Y + 1, x, y + 1, WHITE);
display.drawLine(CLOCK_CENTER_X + 1, CLOCK_CENTER_Y + 1, x + 1, y + 1, WHITE);
}
是ok的。
拍照有斷線,實際是沒有的